How To Take Of Material From Railing In Revit - 13 Tips To Master Balusters In Revit Revit Pure / In the railings properties, you can select a top rail type and set the height.
byAdmin•
0
How To Take Of Material From Railing In Revit - 13 Tips To Master Balusters In Revit Revit Pure / In the railings properties, you can select a top rail type and set the height.. Once you've made it here, you're glass railing will be fully installed and you'll be living with the beautiful views that glass creates. Autodesk.starttest.com autodesk revit architecture 2014 certified professional topic objectives collaboration copy and monitor elements in a linked file use worksharing import dwg files into revit create and modify filled regions place detail components and repeating. A simple baluster pattern is provided with the default project template. Check the type of top rail by clicking on railing and edit type. Glass railings have become somewhat ubiquitous in today's design world, but revit doesn't seem to have caught up with doing them easily.
I am unable to change the material of the baluster in the railing even though i am able to change the material of rails. On the properties palette, click edit type. Any material that is placed in a component within revit can be scheduled. Assign material on top rail as desire. Rename it to chain link continuous and select the profile you created earlier.
Revit 2019 Baluster Editing Options Cadline Community from www.cadlinecommunity.co.uk Before we explore the enscape material editor fully, lets take a look at working with materials in the native revit material editor. Choose the baluster placement edit button. Download bim by trex for your revit project today. Once you've made it here, you're glass railing will be fully installed and you'll be living with the beautiful views that glass creates. I'll be blogging about challenges that i come across as bim manager as well as points of interest that are related to bim. Add a material if you wish to. You can create a panel family, but the width is set. The material parameter does not show in the file i put the new baluster and the material was all different from the one in the family.
The rail height can never be higher than the top rail.
This blog is dedicated to all things to do with building information modeling. I'll be blogging about challenges that i come across as bim manager as well as points of interest that are related to bim. Load the profiles into the railing tool in the project evironment So if you have a team of 3 people installing a project with 15 glass panels, it should take about 5 hours total. To take a certified professional exam, find an autodesk certification center: Once you've made it here, you're glass railing will be fully installed and you'll be living with the beautiful views that glass creates. We first edit the justify to, spread to fit pattern. Set the right/left position and the type used. Finally, let us take a look at revit's 'glazing' material. This blog is not sponsored or endorsed by, or affiliated with, autodesk, inc. 6.) now select rail 9 and click the insert button to add a new railing. Choose the baluster placement edit button. Click the 3 small dots to access the top rail properties.
Click the 3 small dots to access the top rail properties. Sections set to phase 2 or 3 with phase filter set to show previous + new, show all, and show complete. Once you've made it here, you're glass railing will be fully installed and you'll be living with the beautiful views that glass creates. To take a certified professional exam, find an autodesk certification center: I thought i'd put together this post to point out the type of day to day frustrations they cause and what i'd like to see implemented to solve the problem.
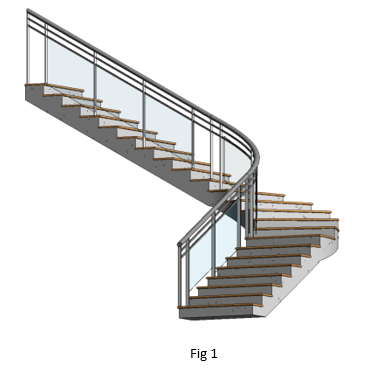
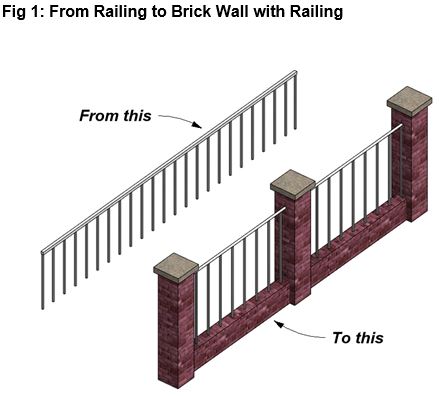
Revit 2020 Brick Wall As Railing Part 1 Cadline Community from www.cadlinecommunity.co.uk 6.) now select rail 9 and click the insert button to add a new railing. For this tutorial, we are going beyond the project environment into the family editor. I even tried making a new baluster and assigning it a material parameter and giving it default material. In revit 2018, multistory option has been removed from the properties palette. In the railings properties, you can select a top rail type and set the height. Choose the baluster placement edit button. You can click duplicate to create a new railing type. In this video, you will learn how to assign a material to a railing.
This means that to get your revit content into the unreal engine using datasmith, you need to:
So if you have a team of 3 people installing a project with 15 glass panels, it should take about 5 hours total. So when you get to the ends of your railing, you have to do math and figure out what. You must edit the rails and the baluster family type. 6.) now select rail 9 and click the insert button to add a new railing. A simple baluster pattern is provided with the default project template. Enscape will generally be able to display the following appearance parameters without having to use the enscape material editor these materials will not show up in the enscape material editor, so editing them inside revit is recommended: Load the profiles into the railing tool in the project evironment I even tried making a new baluster and assigning it a material parameter and giving it default material. We will edit the baluster type settings to get a better result. Download trex bim content to use in your design projects. Before we explore the enscape material editor fully, lets take a look at working with materials in the native revit material editor. Change the height, offset, profile, material, and number of rails within a railing type. The railing is modeled in this model not a link.
The edit baluster placement dialogue box now appears. Here is the steps : The type properties dialogue box is displayed. Unlike top rails, the height is set in the handrail type properties. But there is a railing schedule available, which gives you fields such as type and length for every railing entity.
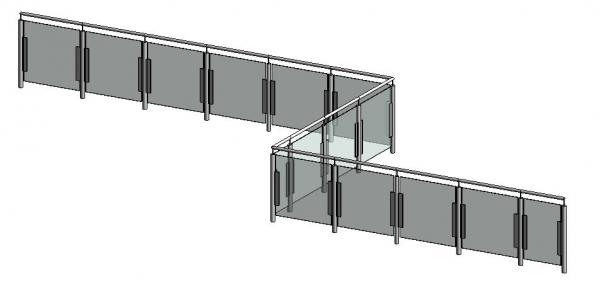
Revitcity Com Object Glass Panel Railing As Curtain Wall from www.revitcity.com A simple baluster pattern is provided with the default project template. Download bim by trex for your revit project today. In this video, you will learn how to assign a material to a railing. In the railings properties, you can select a top rail type and set the height. Set the right/left position and the type used. You can click duplicate to create a new railing type. This means that to get your revit content into the unreal engine using datasmith, you need to: We will edit the baluster type settings to get a better result.
You can have 2 different handrail types for each railing type.
Once you've made it here, you're glass railing will be fully installed and you'll be living with the beautiful views that glass creates. Sections set to phase 2 or 3 with phase filter set to show previous + new, show all, and show complete. Load the profiles into the railing tool in the project evironment Autodesk.starttest.com autodesk revit architecture 2014 certified professional topic objectives collaboration copy and monitor elements in a linked file use worksharing import dwg files into revit create and modify filled regions place detail components and repeating. In revit 2018, multistory option has been removed from the properties palette. Materials are already configured in the material browser. The type properties dialogue box is displayed. In this video, you will learn how to assign a material to a railing. Any material that is placed in a component within revit can be scheduled. The rail height can never be higher than the top rail. Changes made to type properties affect all railings of this type in the project. This blog is dedicated to all things to do with building information modeling. We first edit the justify to, spread to fit pattern.